Knowing Your Sewing Machine
Names of Sewing Machine Parts and their Functions
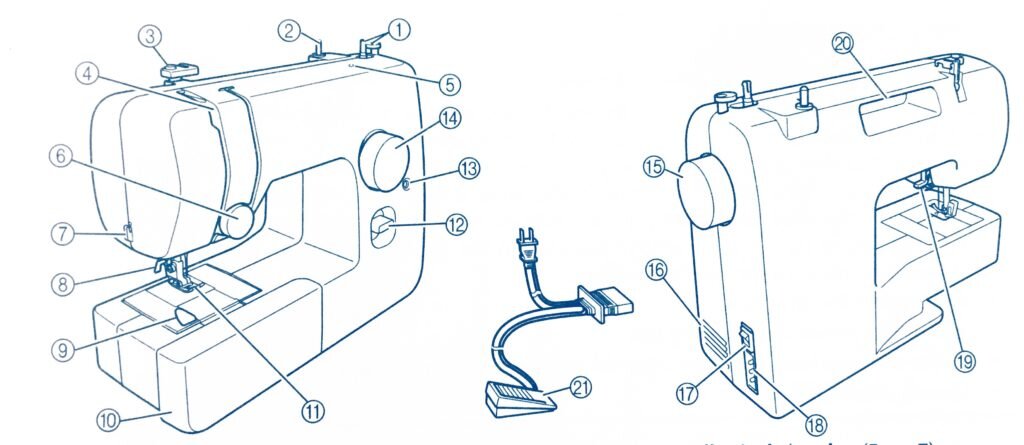
The various parts common to most sewing machines are shown below in two examples. The parts may look different on each model, and they may have slightly different locations, so you'll need to open your owner's manual.
Brother Sewing Machine
Bobbin winder
This winds the thread onto the bobbin for use as the lower thread.Spool pin
This holds the spool of thread.Thread guide
This is used when winding the thread onto the bobbin and then threading the machine.Thread take-up lever
Hole for extra spool pin
This holds a second spool of thread for sewing with the twin needle.Upper tension-control dial
This controls the tension of the upper thread. The tension of the tread will affect the quality of your stitches. You may need to adjust it when you change the fabric or thread. It is recommended to do a test sample on a scrap of fabric before you start to sew.Correct tension is important as too much or too little tension will weaken your seams or cause puckers on your fabric.If the upper tension is too tight, loops will appear on the surface of the fabric. The solution is to reduce tension by turning the upper tension control to a lower number.If the upper tension is too loose, loops will appears on the back of the fabric. The solution is to increase the tension by turning the upper tension control dial to a higher number.Thread cutter
Pass the threads through the thread cutter to cut them.Needle threader
Quick-set bobbin
Flat bed attachment with accessory compartment
Presser foot
You may need to change the presser foot depending on what you want to sew and how.Reverse sewing lever
Push this lever to stitch in the reverse direction.
You can use reverse sewing for reinforcing seams.Buttonhole fine-adjustment screw
Pattern selection dial
Rotate the dial in either direction to choose the stitch you want.Handwheel
Used to manually raise and lower the needle.Air vent
The air vent allows the air surrounding the motor to circulate. Do not cover the air vent while the machine is being used.Main power and sewing light switch
You can turn the main power and sewing light switch on and off.Foot controller jack/socket
Plug in the foot controller plug and connect the machine to the power supply.Presser foot level
Used to raise and lower the presser footHandle
Carry the machine by its handle when transportingFoot controller
You can use this to control the sewing speed, and to start and stop sewing.
Brother Computerized Sewing Machine
Bobbin winder
This winds the tread onto the bobbin for use as the lower thread.
Not winding the bobbin properly may cause the thread tension to loosen and may break the needle.Spool pin.
This holds the spool of threadHole for extra spool pin
This holds a second spool of thread for sewing with two needles.Upper tension-control dial
This controls the tension of the upper thread. The thread tension will affect the quality of your stitches. You may need to adjust it when you change fabric or thread. It's recommended to do a test sample on a scrap of fabric before you start to sew.Correct tension is important as too much or too little tension will weaken your seams or cause puckers on your fabric.If the upper tension is too tight, loops will appear on the surface of the fabric. The solution is to reduce the tension by turning the upper tension control dial to a lower number.If the upper tension is too loose, loops appear on the wrong side of the fabric. The solution is to increase the tension by turning the upper tension control dial to a higher number. The upper thread may have been incorrectly threaded as well.Thread guide
This is used when winding the tread onto the bobbin and then treading the machine.Thread take-up lever
Thread cutter
Pass the threads through the thread cutter to cut them.Flat bed attachment with accessory compartment
Operations buttons
The operation buttons differ depending on the sewing machine model.Operation panel
This is used to select the stitch and specify the various settings.Handwheel
Used to manually raise and lower the needle.Main power and sewing light switch
Jack/socket connector
Insert the plug on the power supply cord into the jack/socket connector.Foot controller jacksocket
Plug in the foot controller plugFeed dog position lever
Use the feed dog position lever to lower the feed dogs.Presser foot level
Used to raise and lower the presser footFoot controller
You can use this to control the sewing speed, and to start and stop sewingHandle
Carry the sewing machine by its handle when transporting the machine

