Clipping Inward Seams
Mastering the Art of Clipping Inward Seams: A Step-by-Step Guide
Sewing projects often involve working with curves, corners, and seams that require precision and care. One essential technique for achieving smooth, professional-looking results is clipping inward seams. In this blog post, we'll explore why clipping inward seams is crucial, how to do it effectively, and share some tips and tricks to help you master this technique.
Why Clipping Inward Seams is Important
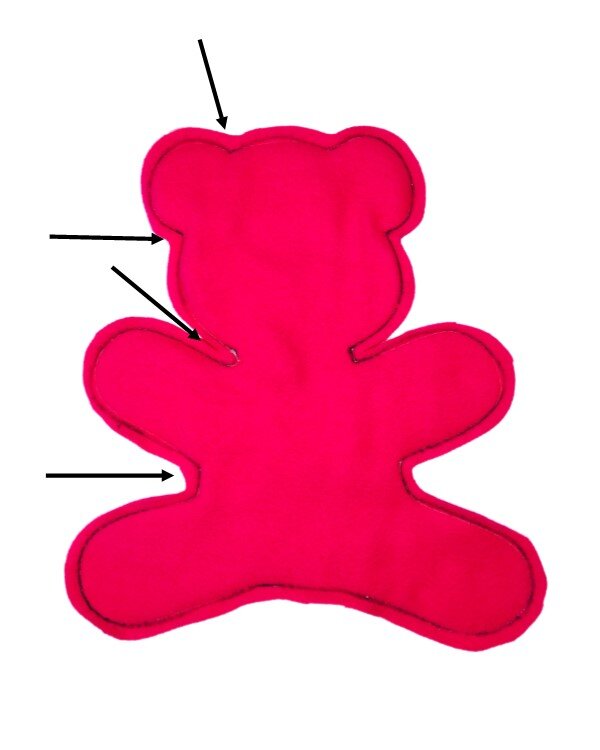
When sewing curves or corners, the fabric naturally wants to bunch up or create bulk. Clipping the seam allowance allows the fabric to spread out and lay flat, resulting in a smoother, more polished finish. This is particularly important in areas like armholes, necklines, and curved edges of soft toys or plushies.
What You'll Need
Before we dive into the steps, let's gather the essential tools for clipping inward seams:
Sharp fabric scissors or small embroidery scissors: Precision is key, so make sure your scissors are sharp and easy to handle.
Seam ripper: Just in case you need to undo any stitches.
Pins or clips: To hold your fabric pieces together.
Step-by-Step Instructions
Sew the Seam: Start by sewing your seam as usual, following your pattern's instructions. Make sure to backstitch at the beginning and end to secure your stitches.
Press the Seam: Pressing the seam allowances open or to one side helps set the stitches and makes clipping easier. Use an iron to press your seams flat.
Clip the Seam Allowance: Using your sharp scissors, make small, even cuts perpendicular to the seam line, being careful not to cut through the stitching. The cuts should be spaced about 1/4 to 1/2 inch apart. For tighter curves, make the clips closer together.
Trim Excess Fabric: In some cases, you may need to trim the seam allowance down to reduce bulk further. Be cautious not to trim too close to the stitches.
Press Again: After clipping and trimming, press the seam again to help the fabric lie flat. This will give your project a crisp, professional look.
Tips and Tricks
Use small, precise scissors: Smaller scissors provide better control and reduce the risk of accidentally cutting through the seam.
Practice on scrap fabric: If you're new to this technique, practice clipping on a scrap piece of fabric to get the hang of it.
Be patient: Take your time when clipping inward seams. Rushing can lead to mistakes and uneven results.
Reinforce delicate fabrics: For delicate or fraying fabrics, consider reinforcing the seam with a line of stay stitching before clipping.
Common Mistakes to Avoid
Cutting too deep: Be cautious not to cut through your stitching line. If you do, you'll need to re-sew the seam.
Inconsistent clipping: Uneven clipping can cause the fabric to bunch in some areas and lay flat in others. Aim for consistent, evenly spaced cuts.
Skipping the pressing step: Pressing is crucial for setting the seam and achieving a smooth finish. Don't skip this step!
Sewing Bee University: Free Tutorials and More!
For more sewing tips and techniques, check out our Sewing Bee University, where we offer free tutorials to help you improve your sewing skills. Whether you're a beginner or an experienced sewist, there's always something new to learn!
Recommended Supplies
Looking for high-quality sewing tools? Check out these affiliate links for some of our favorite supplies:
Sharp Fabric Scissors
Embroidery Scissors
Seam Ripper
Pins and Clips
Iron
Shop our affiliates for sewing supplies and classes!
Clipping inward seams is a fundamental technique that can elevate the quality of your sewing projects. With practice and patience, you'll achieve smooth, professional-looking results every time. Happy sewing!

![FullSizeRender[1].jpg](https://images.squarespace-cdn.com/content/v1/5d7ace087b4bf97e3b2ce5e3/1569546639962-BBBW1351G19YTKA5I28C/FullSizeRender%5B1%5D.jpg)